Docker-Hole (Ad Blocking on the Go!)

Block Ads Remotely with Pi-Hole, WireGuard, and Docker!
If you’re reading this blog, theres a good chance you already know about Pi-Hole, the popular tool for blocking unwanted ads within your home network. But wouldn’t it be cool to bring this tool with you whever you may be? This can be done with a few simple tools which we’ll be running inside docker containers for added simplicity.
- Step 1: Install Docker and Docker Compose
- Step 2: Create and start the Pi-Hole Docker container
- Step 3: Create and start the WireGuard Docker container
- Step 4: Forward the port for WireGuard on your firewall/router
- Step 5: Copy WireGuard peer configuartions to your mobile devices
Step 1: Download and install Docker and Docker-Compose for your OS (I will be using Raspbian).
1
sudo apt install docker docker-compose
You may need to start and enable the service depending on your OS
1
2
systemctl start docker.service
systemctl enable docker.service
Step 2: Installing Pi-Hole inside a Docker container
Head on over to Pi-Hole’s Docker Hub and copy the docker-compose contents into a new .yml file on your host. Be sure to make the necessary changes to suit your needs.
1
2
3
4
5
6
7
8
9
10
11
12
13
14
15
16
17
18
19
20
21
22
23
24
25
26
27
28
29
30
31
32
33
34
35
36
37
services:
  pihole:
    container_name: pihole
    image: pihole/pihole:latest
    # For DHCP it is recommended to remove these ports and instead add: network_mode: "host"
    ports:
      - "53:53/tcp"
      - "53:53/udp"
      - "67:67/udp" # Only required if you are using Pi-hole as your DHCP server
      - "80:80/tcp"
    environment:
      TZ: 'America/Chicago'
      # WEBPASSWORD: 'set a secure password here or it will be random'
    # Volumes store your data between container upgrades
    volumes:
      - './etc-pihole:/etc/pihole'
      - './etc-dnsmasq.d:/etc/dnsmasq.d'
    #   https://github.com/pi-hole/docker-pi-hole#note-on-capabilities
    cap_add:
      - NET_ADMIN # Required if you are using Pi-hole as your DHCP server, else not needed
    restart: unless-stopped

### EXTRA NETWORK CONFIGURATION TO SETUP A
### STATIC IP ADDRESS FOR THE PIHOLE DOCKER
### CONTAINER ###

    networks:
      network:
        ipv4_address: 172.50.0.2

networks:
  network:
    driver: bridge
    ipam:
      config:
        - subnet: 172.50.0.0/16
          gateway: 172.50.0.1
I’ve added additional network settings at the end of the configuration that will setup a new bridged network and a static IP address for the docker container running Pi-Hole. We don’t want the IP address of this container changing if the container or host is restarted. In this configuration the container will always be assigned the IP address of 172.50.0.2 and a gateway of 172.50.0.1
- Save the file, E.g. pihole-docker.yml
Create the container
1
docker-compose -f pihole-docker.yml up -d
1
2
3
4
5
6
7
8
9
10
11
12
13
14
15
Creating network "mike_network" with driver "bridge"
Pulling pihole (pihole/pihole:latest)...
latest: Pulling from pihole/pihole
85e50d2242ce: Pull complete
205b3bcb04a1: Pull complete
4f4fb700ef54: Pull complete
efc47020d282: Pull complete
3a438191e6f2: Pull complete
a090ee43303f: Pull complete
10002067986b: Pull complete
30034a05debf: Pull complete
d61aa1a24eb4: Pull complete
Digest: sha256:562766abc805d5005bb2d2aa5d4bbf2d9b347380b1ea4504fb59b2100500f672
Status: Downloaded newer image for pihole/pihole:latest
Creating pihole ... done
The container is now created and started, verify by issuing the following command
1
docker ps
Verify you can access Pi-Hole’s dashboard locally, http://hostIP/admin
Step 3: Installing Wireguard inside another Docker container
Now we need to setup a VPN server so we can access our private network remotely. We’ll be using LinuxServer’s Docker image.
Paste the following contents into a new file on your host, save it with extension .yml. Be sure to make the necessary changes to suit your needs.
1
2
3
4
5
6
7
8
9
10
11
12
13
14
15
16
17
18
19
20
21
22
23
24
25
26
27
28
29
30
31
32
33
34
35
36
37
38
39
40
41
42
43
services:
  wireguard:
    image: lscr.io/linuxserver/wireguard:latest
    container_name: wireguard
    cap_add:
      - NET_ADMIN
      - SYS_MODULE
    environment:
      - PUID=1000
      - PGID=1000
      - TZ=America/Chicago
      - SERVERURL= #YOUR WAN/EXTERNAL IP ADDRESS HERE
      - SERVERPORT=51820
      - PEERS=Mike_iPhone,Mike_Laptop #NAMES OF MOBILE DEVICES
      - PEERDNS=172.50.0.2 ###THE IP ADDRESS WE ASSIGNED THE PIHOLE CONTAINER
      - INTERNAL_SUBNET=10.13.13.0 #optional
      - ALLOWEDIPS=0.0.0.0/0 #optional
      - LOG_CONFS=true #optional
    volumes:
      - /home/$USERNAME/docker/wireguard/config:/config #LOCAL WIREGUARD CONFIG LOCATION
      - /lib/modules:/lib/modules
    ports:
      - 51820:51820/udp
    sysctls:
      - net.ipv4.conf.all.src_valid_mark=1
    restart: unless-stopped

### EXTRA NETWORK CONFIGURATION TO SETUP A
### STATIC IP ADDRESS FOR THE WIREGUARD DOCKER
### CONTAINER ###

    networks:
      network:
        ipv4_address: 172.50.0.3

networks:
  network:
    driver: bridge
    ipam:
      config:
        - subnet: 172.50.0.0/16
          gateway: 172.50.0.1
Note the “PEERDNS” value in the above configuration, it’s the IP address of the Pi-Hole container.
Per the network configuration, the WireGuard container will be assigned to the same network as the Pi-Hole container and will always be assigned the IP address of 172.50.0.3 and a gateway of 172.50.0.1
Create and run the container
1
sudo docker-compose -f wireguard-compose.yml up -d
1
2
3
4
5
6
7
8
9
10
11
12
Pulling wireguard (lscr.io/linuxserver/wireguard:latest)...
latest: Pulling from linuxserver/wireguard
6dfc71ecd6ee: Pull complete
07a0e16f7be1: Pull complete
efbf43c6653c: Pull complete
757becd0c00b: Pull complete
7afeddcdf0d2: Pull complete
1abddf4bd11b: Pull complete
6e047b85f8c9: Pull complete
Digest: sha256:ce2327480d1710c1a2baea7118c6c6716524fb478c3bd37ec654a5d3259db868
Status: Downloaded newer image for lscr.io/linuxserver/wireguard:latest
Creating wireguard ... done
The container is now created and started, you can verify by issuing the following command
1
docker ps
Step 4: Port Forwarding
Forward port 51820 to the host running your Docker containers
Here is what that looks like on my EdgeRouter

Step 5: Copy WireGuard peer configurations to your mobile devices
Wireguard has a cool built in feature that will generate a QR code for each peer that you can scan with your mobile device.
1
sudo docker exec -it wireguard /app/show-peer Mike_iPhone #in this case we used Mike_iPhone and Mike_Laptop when we created the container
A QR code should be displayed for “Mike_iPhone”
If you are unable to use QR codes, client configuration files are saved at the location specified in the docker-compose configuration file for WireGuard. In this case it’s /home/$USERNAME/docker/wireguard/config
An additional setting needs to be changed in Pi-Hole’s DNS tab to accept DNS queries from all origins
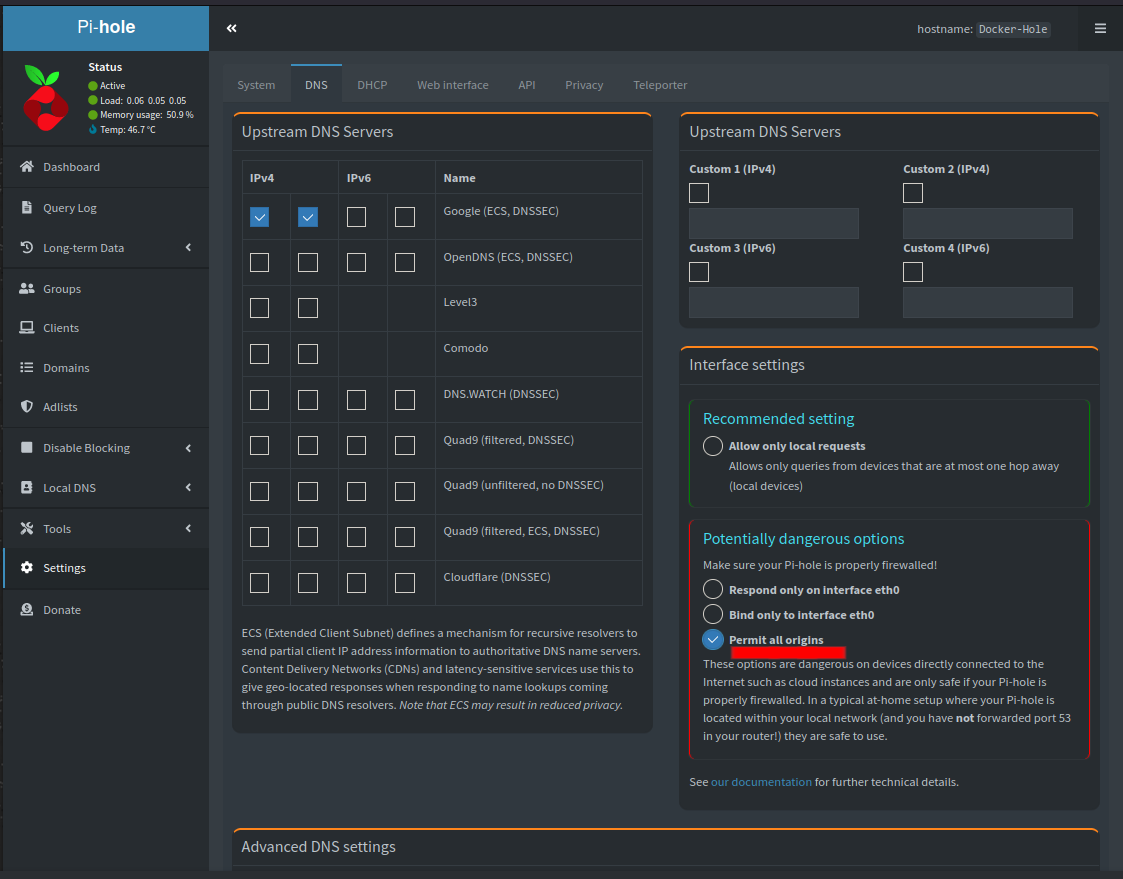
Be sure to click the save button at the bottom of the page
If you are having connectivity issues or slow speeds try setting the MTU on the client to 1300 (I find that this helps a lot when you’re on a cellular network
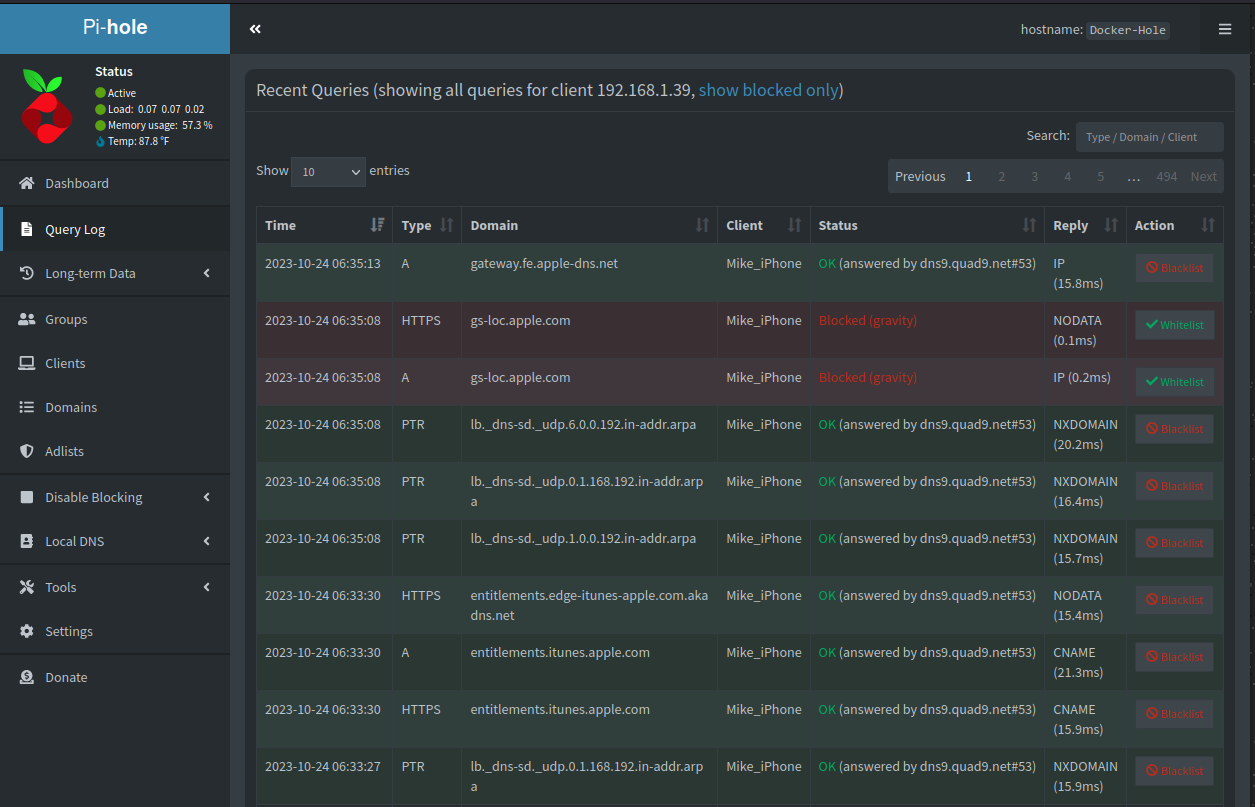
Step 6: Verify Pi-Hole is receiving DNS requests from WireGuard